The IST2D system may be used in holes of any orientation, however as a two dimensional system, some estimate of the stress in the axial direction of the borehole will need to be arrived at to complete the measurements perpendicular to the hole axis. While theoretically three tests may be carried out at different orientations to arrive at a complete stress tensor drilling three boreholes is generally an expensive and inconvenient option. In addition, the variability of stress in rock frequently makes the calculation of a precise stress tensor difficult. Normally the IST2D test is conducted in near vertical holes and the vertical stress is assumed to be the overburden stress.
As the IST2D tool measures the diameter of the pilot hole through mechanical contacts it may be used for repeated tests quite rapidly. Tests at 50 m may take one hour, at 400 m two hours and at 800 m in four hours. The tool has been used to 1050 m depth and is capable of operation to 2000 m. The six pilot hole diameter measurements can provide 1 estimate of stress using six diameter changes, 6 measurements using five diameters, 15 measurements using four diameters and 20 measurements using three diameters. There is therefore a good degree of redundancy available in stress measurements.
As depth increases the component of pilot hole deformation associated with axial (vertical) loading and Poisson’s ratio increases to the point where it may dominate over deformations brought about by lateral stresses. In this case the lateral stresses calculated become less certain.
The test method is ideal for near vertical holes to 800 m from the hole collar. As depth increases the measurement of Poisson’s ratio becomes critical to obtaining precise answers.
The IST2D process is shown in Figure 1. Variants of the tool have been in use since 1996 in over 1300 stress measurements. Figure 2 shows the tool in use while Figure 3 shows the tool with the overcore from which it has just been extracted.

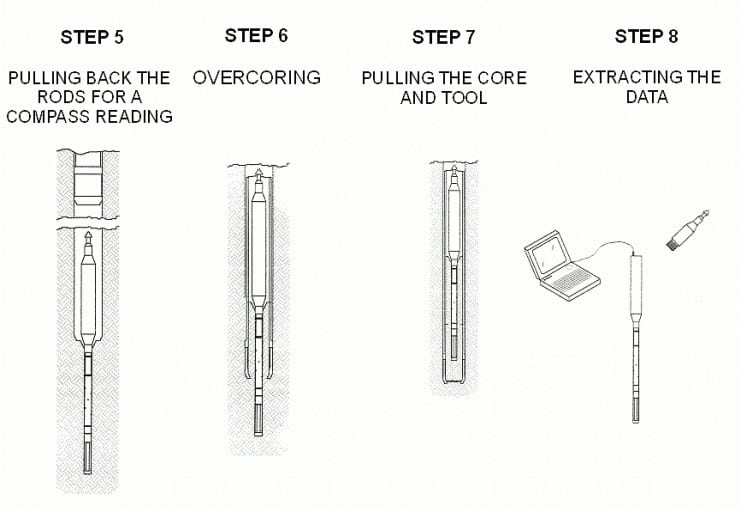


Figure 4 shows the deformation profile as the core bit cuts over the top of the pins and Figure 5 shows the best theoretical fit to measured pin deformations. Using this deformation profile and the rock properties the stresses may be calculated. Determining the correct rock properties for use in analysis is therefore very important.
The tool has been used in hard and soft rocks in civil, mining and petroleum applications.


